you are what you eat


This is my third assignment for my Form and Structure course, and it's due tonight. The assignment was called 'The Body'. The guidelines were:
- The structure of your work can either be a fragment of the body OR a relationship/association created between 2 or more body parts.
- Your completed broject will focus on, and be expressive of, a theme/idea/meaning
- Your sculpture can be abstract/representational/self-contained/assemblage/installation/personal/political
- Materials suggested: mould-making medium, plaster, plaster bandage, air-drying clay, sculpy, wax, wood, fabric, organic materials, etc.
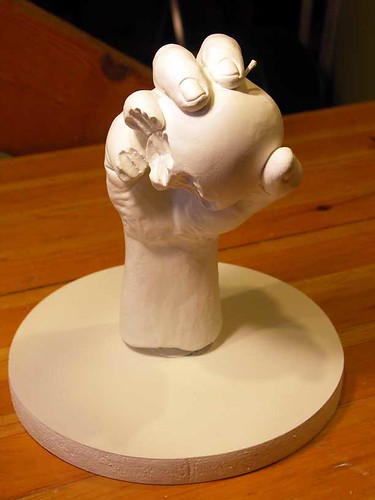
Anyway, I really wish I had taken pictures of the whole process for ya'll. Instead I'll just tell you how I did it. I used alginate to make a 'negative' mold of my friend Melissa's hand, holding an apple, sans bite. Then I made a 2-part plaster bandage shell to hold it all together while it set. The shell also allows for you to pour your material to make your 'positive'. We then melted down some oil-based clay and poured it into the alginate/plaster bandage mould and poured it in. Once it was set, we pulled off the mould and had a great clay positive of my sculpture.
Then Melissa took a few bites out of the clay (yuk) and I used some hand tools to clean it all up. Then we repeated the alginate/plaster bandage process to make a new negative to pour the hydrocal (white gyspum cement) into. When the hydrocal started to set, we inserted a 3/4" wood dowel into the base, for mounting, and let it dry overnight. During the curing process, the dowel expanded with the moisture and heat and unfortunately cracked the base below the wrist. So I had to mix up some more hydrocal and work it into the cracks. Next time I'll remember to use a metal rod.
Once it was all dry, I sanded it and used spray primer to get it as white as I could. Kirk helped me make a plywood base (phew!) and I primed that as well. Last night I put it all together and this morning I epoxied in a real apple stem that I also had primed, and VOILA! Done, aaaaand done.
Ok. I'm off to school to present it to my class, where I will endure all manner of critique. Wish me luck!


4 comments:
Holy krap that looks so awesome! You'll have to keep me posted on how you did!
xoxoxo
i was going to say so you are modelling clay that was cooked but then i saw the finger missing, that's awesome i like it.
thanks!!!
Holy Moly, I LOVE IT! *S*
Excellent work hon.... I hope you get an A+
Post a Comment